MetaClean Control is a cross-platform tool that allows you to view, search, modify, and delete metadata from your documents and images, as well as audio and video files, preventing the exposure of sensitive and/or confidential information when sharing these types of files. It does not require the installation of Microsoft Office, Open Office, or Adobe Acrobat, and it needs no internet connection to function.
The application supports a wide variety of image, audio and video files, can handle large documents (over 100 MB) and allows editing or deleting metadata from a large number of files at the same time, as well as performing file searches based on the content of their metadata.
02 - MetaClean Control Installation
MetaClean is compatible with the following operating systems: Microsoft Windows, Linux, Unix and Mac OS X.
From MetaClean Control You can download the trial version for free, by selecting the operating system type and whether or not you have Java installed on your computer.
All functions are available in the trial version, but with the following restrictions:
– A maximum of 3 files can be modified at the same time.
A maximum of 50 modified files is permitted.
– The following text will appear in each processed file:
«Developed by MetaClean (www.adarsus.com) - Trial License»
will be included in the metadata: «Application»
The professional version removes the restrictions of the trial version:
An UNLIMITED number of files can be processed at the same time.
Free updates and technical support for the first year.
Disabling the message «Developed by MetaClean (www.adarsus.com) -Trial License-» from the «Application» metadata.
Once the installation is complete, a shortcut will be created on your desktop, from which you can access the application's main menu. MetaClean is easy and intuitive and does not require an internet connection to function.
From the option «» which appears on the right of the main screen, you can pre-set the default directory where file searches will begin, which simplifies and speeds up work. However, you will always have the option to change the source of the files for each search, should you wish.
3.1 – Upload files
The «Load Files» option allows you to manually select files from the directory you'll be working with; it also allows you to filter them by file type by clicking on the «Files of type» dropdown menu.
3.2 – Editing metadata
Once the files have been uploaded, clicking on any of them will allow you to view all the metadata corresponding to the selected file in the right-hand column of the main window. From this window, you can edit the content of the different metadata fields and/or add custom metadata.
To remove all metadata from the file, click the icon:
When you have finished modifying the values of the different metadata fields, save the changes to the file by clicking on the icon:
Upon completion of the file saving process, the icon will appear
indicating that the process has finished correctly.
To avoid having to repeatedly enter the same information into various metadata fields, you can use metadata templates. To do this, fill in the data you are interested in and click the icon
to save them as a metadata template.
When you want to apply these values to a new file, simply click the icon
and the different metadata fields will be automatically populated with previously saved values.
Image file metadata
The main existing standards for defining metadata in digital images are: EXIF, IPTC and XMP.
EXIF It is the most widely used metadata format by digital cameras. It defines a series of tags that describe the camera's characteristics (manufacturer, model, software, etc.) and its settings at the time of image capture.
IPTC It is a consortium formed by the main news agencies and media companies. At IPTC, journalistic organisations develop and maintain technical standards to improve and standardise the exchange of news between agencies worldwide.
XMP It is a standard that defines a model for the creation and processing of metadata, based on XML tags. This model uses one metadata schema to store basic properties and another schema for each device or application to store its own information. In this way, each application can use this common method to capture and share its metadata.
Some types of metadata are created and exclusively used by one of the standards. Conversely, other types of metadata are implemented by more than one standard.
MetaClean allows for simple and intuitive processing of the metadata stored for each of these standards.
MetaClean allows you to geolocate your images; to do this, we will upload the images to the main workspace as previously described, select the image and click on the button
A new window will open, in which, in the «Address» field, we will enter the address of the place where the photograph was taken; it is not necessary to know the exact address of the place, it is enough to give a reference to it:
Next, we will press the «ENTER» key or click the button
As can be seen in the following image, all the address location fields entered will be automatically completed, also showing the location on a map that will allow us to zoom in and even change its view.
To finish, we'll save the GPS location by clicking the button
Considerations for audio, video, and image files:
Only metadata that is modifiable will be deleted or edited; there is a large amount of metadata that is necessary for different market tools to be able to manipulate or visualise these types of files.
Metadata templates are not applicable to this file type.
Additionally, MetaClean provides several work shortcuts once the files have been loaded. To access these, we will place the mouse pointer over the «loaded files» area and right-click the mouse. A drop-down menu will appear, allowing us to choose from the following options: «Load files», «Delete selected files from the list», «Copy or move files to another directory», «Export metadata», «Open file location», or «Open file», with a single click.
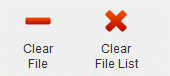
3.3 – Delete File and Delete All
The options «Delete file» and «Delete file list» allow you to remove one or multiple files from the list of uploaded files. However, The files will never be deleted from the operating system.
3.4 – Searching for files
This tool allows you to Load the different files automatically; You just need to indicate the type of file you want to upload and the directory to search in (and whether you wish to search subdirectories too).
When the search process is complete, the «Find Files» window will close automatically and the found files will be displayed in the main window.
3.5 – Metadata Search
Metadata search allows you to search for files based on the content of each metadata field. First, you will need to select the file type you wish to search for.
Next, select the file types you want to search for (Word, Excel, ...), the search directory and, finally, fill in each of the conditions that must be met.
In this example, all PDF files found in the directory C:\Carlos\personal\Adarsus (and subdirectories) whose Author metadata contains the string: cgonzalezg will be searched for.
When the search process is complete, the «Search for metadata in files» window will close automatically and the files that meet the specified criteria will be displayed in the main window.
Below, you will find another example of searching for media files based on their metadata. In this case, we select the option: Image, audio and video files.
We will search the directory G:\Test Images (including subdirectories) for all images that have GPS coordinates and whose camera model contains the string: Nikon
3.6 – Organising files
The «Organise files» option allows you to copy or modify one or more files at a time.
In the main window, select the files you wish to move or copy.
Next, click the «Organise files» button. The following window will appear, where we will select the destination directory and the action (copy or move).
Next, click the icon«
»To start the operation.
For each document, a message will be displayed indicating the result of the process: «File copied/moved successfully».
If we combine the «Search by Metadata» tool with the «Organise Files» tool, we could, for example, organise our photographs according to the date they were taken and then move them to a directory indicating the corresponding trip.
To do this, we would indicate in the metadata the date the photograph was taken and then move it to the desired directory.
Furthermore, we could organise all our documents into different directories according to the content of their metadata.
(for example, organise them by document title or author).
3.7 – Exporting metadata
The «Export metadata» option is designed to export the metadata of Microsoft Office, Open Office, and PDF files to an Excel or CSV file.
To do this, select the files you wish to export and click the «Export Metadata» button.
A new window will then appear where you will need to select the directory where you wish to save the file with the exported metadata, choose the file type (CSV or Excel), and finally, click the process button.
MetaClean will display a message for each file processed, indicating the result of the export. At the end of the process, a file called «Metadata-exported» will have been created in the previously selected directory, which will contain the metadata of the selected files in the chosen format.
In our example, we have selected an Excel file where we can see that the first columns identify the full path of the processed file and its type, followed by a column for each type of metadata.
In the exported file, a column will be created for each type of metadata a document can contain:
Document Title.
Document subject.
Author of the document.
Document keywords.
Document creation date.
Document modification date.
Tool used to create the document.
Tool manufacturer that created the document.
Document custom properties.
Company name.
Administrator.
Document category.
Document status.
Modified by.
Document review.
Document template.
Document content type.
Document editing time.
Date of last document print.
Document comments.
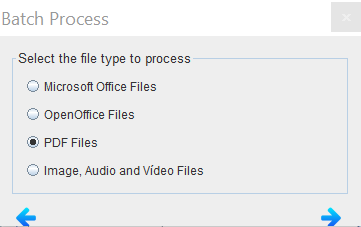
3.8 – Batch Processing
The «Batch process» option allows you to process the metadata of a large number of files at once.
Upload the files you wish to process and click the «Batch process» button.
2) Select the file types you want to process and click the button
Automatically, PDF files uploaded to the main window will be displayed in the new «Batch Processing» window.
Modify the metadata fields in the same way as shown above for individual files (point 3.2 – Editing Metadata-). You have the options to delete metadata, create templates or apply an existing one. The changes will be applied to all documents in the list, without the need to select them individually.
The tool offers several modification options in each metadata field:
Maintain: retain the original metadata text, without modifying or deleting it.
Change: allows editing the field to modify it.
Add: retain the original text, after which the new desired text will be added.
Add to the beginning: retain the original text but add the desired modification before the original text.
Remove: remove the metadata.
We can also perform actions on the files uploaded to the list; if you right-click on the area of the uploaded files, a menu will appear allowing the following actions: upload more files for batch processing, use the automatic file search tool according to the conditions we have chosen, display the metadata of the selected file, show the directory where the file is located, open the file with the default tool, or finally, delete it from the list.
Finally, you must choose between overwriting the original files, applying the set metadata configuration, or saving them as new files in the directory you specify (original files will not be modified). To start batch processing, click the icon
Once the task is complete, a message will be displayed showing the result of the file processing, as well as a new tab: «Message Output,» which will provide more detailed information in case any warnings or errors occur in any of the processed files.
3.9 Purchase product
The product can be purchased from the official website. www.adarsus.com, which can be accessed by clicking the button:
Once the purchase process is complete, a payment confirmation email with brief instructions on how to activate your licence will be automatically sent to the buyer. You can download them. Here.
MetaClean-ID: a code that uniquely identifies your computer; this code will be used to obtain your licence activation code, which will be linked to your computer.
3.10 Update MetaClean
This functionality will allow us to keep our product updated quickly and easily; no additional configurations or activations will be necessary.
04 - Access to MetaClean OneClick (Windows platform)
This is an additional product distributed free of charge for Windows platforms. It allows you to remove the metadata from selected documents with a single click.
To test this, open File Explorer, select the files you want to clean, right-click, and select the «Send to» option > «Remove metadata with MetaClean».
A window will appear showing the metadata removal process for the selected files.
If the file selection includes a directory, a window will appear where we can choose which types of files will be cleaned within the selected directory or directories.
Tick the box« » so that the tool searches for files within subdirectories.
Once the file types to be searched have been selected, click the «" button.«
»to start searching for files within directories.
At the end of the process, a window will be displayed with the list of found files; click the button «
» to start the process of removing metadata from the files in the list.
At the end of the process, a message will appear showing the result of the file processing.
If you have any questions or comments, please write to sales@adarsus.com
Manage consent
To provide the best experiences, we use technologies such as cookies to store and/or access information on your device. Consenting to these technologies will allow us to process data such as browsing behaviour or unique identifiers on this site. Not consenting, or withdrawing consent, may adversely affect certain features and functions.
Functional
Always active
The storage or technical access is strictly necessary for the legitimate purpose of enabling the use of a specific service explicitly requested by the subscriber or user, or for the sole purpose of carrying out the transmission of a communication over an electronic communications network.
Preferences
The technical storage or access is necessary for the legitimate purpose of storing unsolicited preferences of the subscriber or user.
Statistics
Technical storage or access that is used exclusively for statistical purposes.Storage or technical access which is used exclusively for anonymous statistical purposes. Without a request, voluntary compliance by your Internet service provider, or additional records from a third party, information stored or retrieved solely for this purpose cannot be used to identify you.
Marketing
Technical storage or access is necessary to create user profiles to send advertising, or to track the user across a website or across multiple websites for similar marketing purposes.


 » which appears on the right of the main screen, you can pre-set the default directory where file searches will begin, which simplifies and speeds up work. However, you will always have the option to change the source of the files for each search, should you wish.